
After lots of success with the broken wing butterfly, I noticed that when I was tested, the difference between a big profit and a big loss was often a fairly small move. I was looking for something more forgiving that had similar decay to the butterfly. I discovered a strategy that might have even more interesting performance, the broken wing condor, using puts. What if I told you that I have another strategy that often makes a 5-10% return in less than two weeks with a good probability of success. If things work out right the return could be much higher.
I first learned about broken wing condor trades from TastyTrade‘s mid-day hosts, Nick Batista and Mike Butler. They call it a broken heart butterfly, as the trade set-up looks like a broken wing butterfly, but with the body split- a “broken heart.” But since butterflies have a common mid-strike and condors don’t, it’s more of a condor than a butterfly, so I think broken wing condor is more accurate.
Many option traders are familiar with Iron Condors, but maybe not a Put Condor or Call Condor. The Iron Condor is a combination of a credit put spread and a credit call spread. Put and Call Condors are combinations of a credit and a debit spread, and either all puts or all calls.
Because many traders don’t frequently trade condors, it can be confusing to understand the trade and the dynamics- this is not a simple concept. So, let’s start by explaining what a condor is and then what makes a broken wing version different. Then we’ll dig deeper from there.
The Regular Condor

A condor is a four part option position that is made up of four contracts, two that are sold, and two that are bought. A standard balanced condor has two equal width spreads, one debit and one credit, some distance apart. For example, we could sell two contracts at strike price of 502 and 510, and buy two contracts at strike prices of 500 and 512. The area between the 502 and 510 short strikes would be the body of the condor, and the distance between the short strikes and the 500 and 512 long strikes would be the wings. So, the body of the condor would be $8 wide, and the wings are each $2 wide. This could be done with either puts or calls, it works either way. You may wonder why would anyone think this is a good trade? Well, since you buy two options and sell two options and the average strike price is exactly the same, the premium to buy this strategy is usually fairly small, a fraction of the max profit or 29% of $2 wings in our example. So, for 58 cents you can own this position. It might be more or less depending on how many days until expiration, the width of the body, the current price of the underlying and the implied volatility, but generally the cost is small if there is some time until expiration. Now, if the underlying closes anywhere between the short strikes on expiration day, it will be worth $2, a big gain on 58 cents. Based on the delta values, the chances of this is about 22%. Most likely, the underlying ends outside of 500 and 512, and the premium spent is lost. So, it isn’t that high of probability trade. It’s great if you win, but mostly a losing strategy.
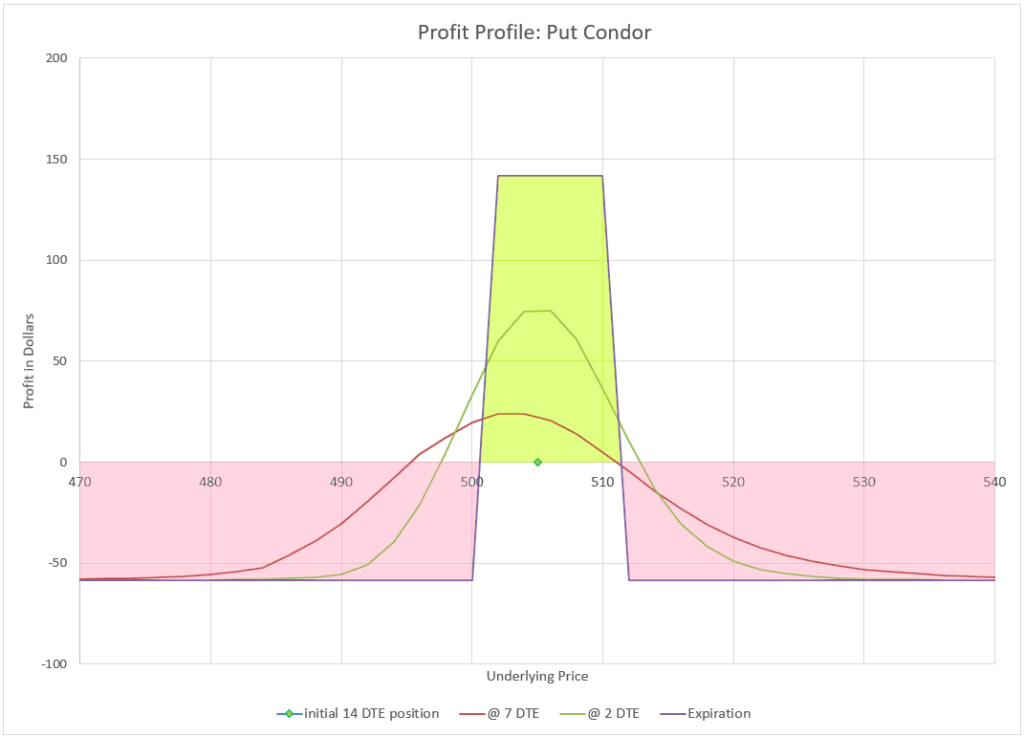
One issue is that the profit from this trade doesn’t occur until right at expiration- until then the premiums tend to cancel each other out, and it is hard to get any profit early. A similar put/call combination trade is the iron condor, with credit put spread and a credit call spread with a gap between the short strikes. The speed of the decay depends a lot on the width of body of the iron condor, wider decays faster, and the same is somewhat true for a put condor, but less so. I don’t really don’t see much use for the standard put condor, mainly because I don’t like expiration day drama with a low probability trade.
Introducing… the Broken Wing Condor!
But, what if there was a way to collect a premium and take away one side of the risk completely and still have the possibility of a big return? Enter the broken wing condor. Maybe this sounds like the logic around the broken wing butterfly, and it is, but slightly different. The goal with the broken wing condor is to collect a credit to open the trade, and expect to keep it, and maybe make even more. With broken wing butterflies, I usually have a 2:1 ratio between the credit spread width and debit spread width, but we’ll need a little bigger ratio with the broken wing condor, because the two spreads aren’t together. So, my starting point is usually 3:1, although I sometimes will go 5:2 if I can get a decent credit. Let’s look at an example.

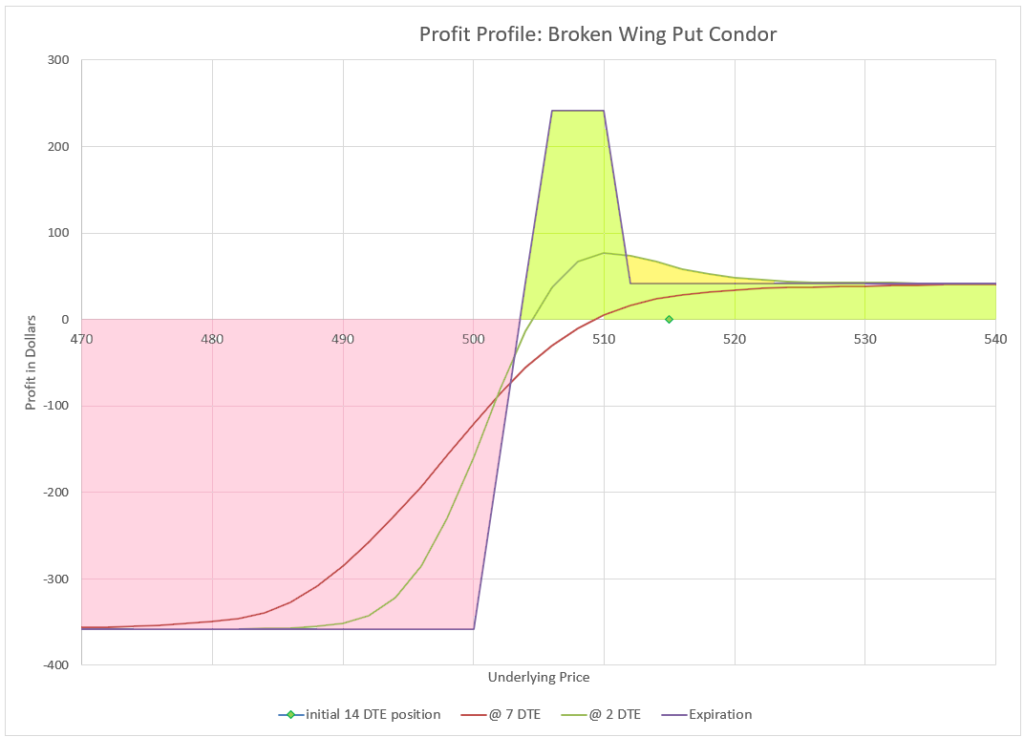
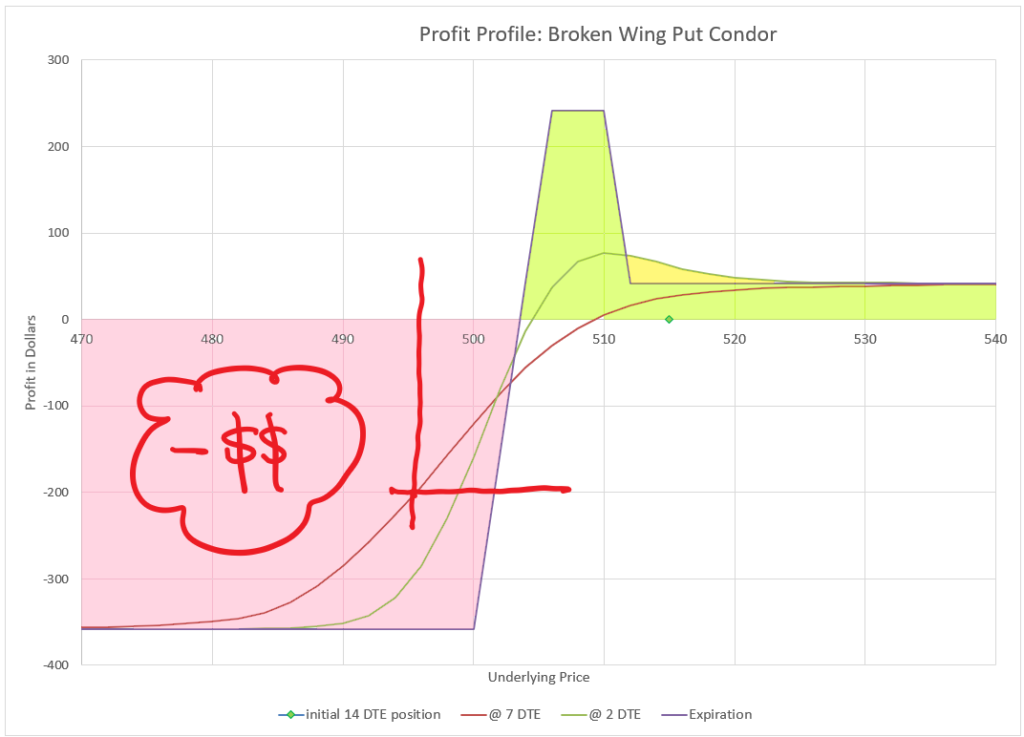
In this example, we have bought a 512/510 debit spread, and sold a 506/500 credit spread. The credit spread has more premium, so the net premium is a credit of 42 cents. Since the credit spread is $6 wide and the debit spread is $2 wide, the capital risk is $4 per share, or $400 per contract. Since we collect $42, the most we can actually lose is $358. In the profit chart below, you can see that at expiration with a price below $500, the max loss is indeed $358.
Managing the broken wing put condor has a little different dynamic. I tend to hold this trade closer to expiration because one feature of this set-up is a fairly high probability of being able to collect an additional credit to close the trade. As we will see as we dig in further, because the credit spread is further away from our initial price than the debit spread, the credit spread will decay faster than the debit spread, which leads to some unique opportunities.
Let’s review the various components of the set-up in a little more detail. The broken wing condors I trade are puts and I like them to have around 14 days to expiration (DTE) when I enter. I generally look at Delta values to pick my entry strikes, and start with a long strike of around 40 Delta. From there I look for an option to sell below that, and look for a spread 3 times as wide that has a long strike around 20 delta. It usually takes a little trial and error, but if all goes well I find a combination that nets between 5-10% of the capital at risk. In the above example, I was able to collect 10% with my low strike right at 20 Delta. I also stick to index options or options on index funds. I am willing to enter a trade collecting less than 10% of the risk capital, because I expect to keep all of the premium and often 1-2% more at closing. I still expect to have close to a 10% return on capital in two weeks.
This works a high percentage of the time, but not always. When the market goes down, I manage the position and hope for the price to land in the body or just above it as expiration approaches, and I can close with a credit. When the market really drops, I maneuver with a series of moves to try and get my money back, or I could owe up to 100% of the capital at risk. I’ll detail how I manage these drama scenarios in a bit, but first let’s break down why I chose each element of the trade to start with.
Why puts?
I mentioned at the top that condors could be created with puts or calls. I’ve tried this strategy with calls, and my success rate is much lower, with much more drama. I specifically use out of the money puts, because they are much more likely to expire worthless than out of the money calls. The market has a tendency to drift in a positive direction most of the time, and the times it goes negative are generally are infrequent and unpredictable. Additionally, the Delta values I use are specifically chosen for this combination of time to expiration, combined with puts and the use of equity indexes. Implied volatility skew changes these pricing and Theta decay relationships between puts and calls, so a broken wing condor with calls is just different than with puts. A call condor might make sense for a stock that is trending down and seems to have a limited upside, but generally I’m not a fan.
Why 40 and 20 Delta for long strikes?
There isn’t a lot of magic to choosing strikes for this trade. It is really a balancing act between the premium of each of the two spreads, the possibility of getting a credit to close, and the risk of a loss.
From a risk standpoint, the position of the lower strikes, the credit spread determines the probability of profit or loss. With a lower long strike of 20 Delta, we can expect a theoretical probability of a loss 20% of the time, but in practice, this tends to be overstated by the skew in put pricing and implied volatility. By trial and error mostly, I’ve found that this level of delta provides rapid decay in this timeframe, and tends to be safe from testing the vast majority of the time. For those more risk averse, it is possible to go lower, but the other strikes will need adjustment and the dynamics of the trades won’t work quite the same way.
On the other spread, the debit spread, I want to have a good probability of the debit spread being in the money or close to it. At 40 Delta, the spread premium can be affordable, but still close to the money.
The gap between the spreads, the body of the condor, is the safety zone. The wider, the bigger the area of max profit. However, as the gap widens, the debit spread gets more expensive relative to the credit spread.
So, 40 and 20 Delta are starting points for me. Picking exact strikes, wing and body widths, and credit received are a bit of an art. It helps if your trading platform makes it easy for you to switch around your strikes by sliding positions up and down together as well as individually.
Why 14 days?
When I first tried this trade, I assumed it was similar in decay to the broken wing butterfly, but I found that most of the action tended to be in the final 2-5 days, so I shortened my target expiration to 14 days. At 14 days, I can collect a nice premium, and still have some room for the underlying price to move without constantly being in trouble. Longer timeframes can provide a little more space, but the return per day is less. Shorter timeframes get the strikes very tight and I don’t like the risk.
I’m not stuck on 14 days. Sometimes I’ll go a little shorter, maybe 11 or even 10 days. I may go longer on a day when IV is high and I can get wider spreads and more premium. Again, there isn’t anything magic about 14 DTE, it just is a comfortable timeframe for me with this trade.
Why a condor vs a butterfly?
I started doing this specific trade as a substitute for the broken wing butterfly, particularly when underlying prices were high. I felt like I had more wiggle room with this trade than the butterfly and more forgiveness when I’m wrong. In reality, it is just a variation of the same concept. When the market seems low and poised to bounce, I’m more inclined to use the broken wing butterfly, and when I want to put on a trade when the market is sitting high, I lean toward the broken wing condor. Some traders may find other reasons to choose one over the other, which makes sense because it is a personal preference. It helps to understand the differences in managing both winners and losers, so be familiar with those differences before making a choice.
Why try to collect a double credit?
I try to get a credit both to open and to close because I can. This trade has an unique feature that often the premium turns positive for a while even out of the money before expiring worthless. In the example, I collected $42 to open the trade. If the price doesn’t move, I may be able to close the position for an additional $10 credit, making my total profit $52, while holding to expiration would give me $42.
Why options on indexes vs stock options?
Stocks tend to have more tail risk, or make big moves beyond what is expected compared to indexes. While indexes can move down large amounts, they do it less often than individual stocks. Indexes don’t have earnings risk, and news impacts indexes less than a story about an individual company.
Many people like to trade options on individual stocks because they often have higher volatility and more premium per option. However, in spreads this advantage is much less, as both the short and long strike have increased premium, greatly cancelling the benefit. In the end there isn’t much additional premium, but a lot of increased risk of outsized moves. So, for this strategy, boring moving indexes are best.
Managing a broken wing put condor
Almost every trade I do, I try to exit or roll as quickly as possible, but this trade is an exception. The key is that the closer debit spread holds value just a little more than the farther away credit spread as time decays.
While the profit profile graph can show this somewhat at different times approaching expiration (note the yellow section of the chart), perhaps a different chart will help determine the best course of action based on price action. Let’s start by looking at the most likely outcomes and most likely extreme moves.
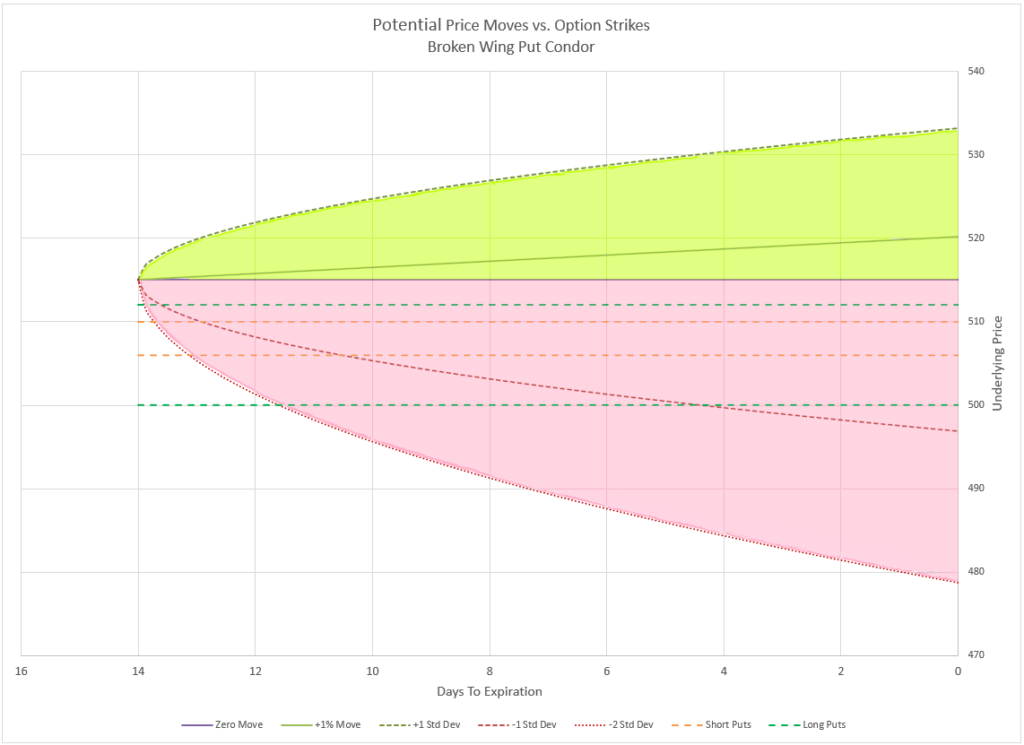
In the above chart, I’ve shown five potential moves of the underlying price during the 14 day life of the trade. One possibility is that price doesn’t change at all, the straight purple line that divides the pink negative section from the green positive section. Another possibility I charted is a 1% increase over the period of the trade, divided equally throughout the trade- this is likely the median move: about half of all occurrences will be high and half lower. Then I charted +1 standard deviation move for all points in time- a one standard deviation move for a day or for whatever timeframe, resulting in a logarithmic curve. I also did the same for negative 1 and 2 standard deviation moves. In reality, it is likely that the price will stay within one standard deviation, but if it goes outside, worst case scenarios are to the downside. I often look at this type of chart to see how different moves would impact my position. The horizontal dashed lines represent the option strikes of the example position. In actuality, the price won’t follow any of these lines exactly, but will vary randomly.
Next, if we take these five outcomes and look how the option premium is impacted over time by each price move, we get the chart result below:
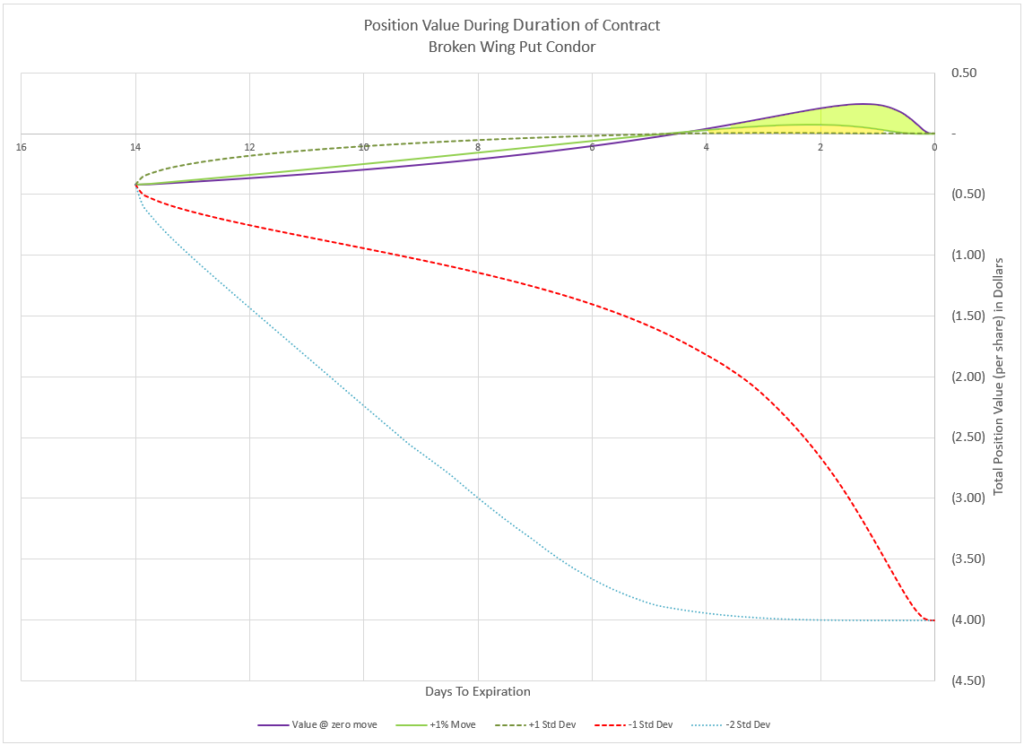
In this chart, the value of the option premium starts with an opening value of ($-0.42). Remember, we collected 42 cents a share to start this trade, so our position value starts negative- we would have to pay to exit. As time progresses on toward expiration, the five lines represent how option premium would change based on the five underlying price moves in the preceding graph. What I want readers to take away from this chart is that all winners are not the same and all losers are not the same either, and some of these moves are very unique to this strategy. As a result, there are a number of ways to manage the results of this trade. It may be helpful to refer back to this chart in thinking about how outcomes lead to different management strategies.
What if the position is tested?
Whenever I introduce a new trade to someone, they always want to know what I do when things go badly. So, let’s start there. The trade wins the vast majority of the time from my experience, but not always. This is a defined risk trade- the maximum loss is defined when the trade is entered. But what is the plan when the index goes down and tests or breaks through the breakeven point? There’s basically three choices (hold ’em, fold ’em, or roll ’em), and each has its place.
Close for loss?
The quick answer is to simply close the spread and take a loss. The condor structure helps keep the loss reasonable as the price moves through the strikes. Until the last few days before expiration, you can get out without a lot of damage. In the chart below, I’ve marked where the losses are around 50% of max loss at 7 days to expiration. This would happen with a negative move somewhere between one and two standard deviations down- not likely, but possible. Setting a stop loss at an amount less than this loss could prevent a drawdown. Many people will set a stop loss at 3x the premium received, meaning they won’t lose more than twice what they collected. So, in our example, $0.42 was collected, so $1.26 stop loss would limit the loss to no more than $0.84. Just set a stop loss at a point where you are okay getting out. This can be effective at avoiding max loss in rapid early moves down.
But, do you really want to close? The probability of touching the break-even point of near the mid point of the credit spread is about 50% before expiration, based on that point having an initial delta of 25. And 50% of those touches will end up profitable. If you put on a stop loss that is too tight, you may often find yourself stopped out right before the position turns around and profits. Still, when you are starting out, I’d suggest getting out if the premium drops in value to 3x the initial credit, saving well over half your capital for another day.
Roll the losing side?
Alternatively, you can split the condor into two spreads and manage them separately. The upper spread is a debit spread, and when tested, it will have a positive value. The lower, wider spread is a credit spread that loses money when tested. The upper debit spread will be more in the money and hedge the wider spread for much of the price decline. A potential action is to sell the debit spread collecting a big premium and roll the wider credit spread to a later expiration, and wait for the market to turn around and reward you. The debit spread will have over 50% of its width as premium when the mid strike is breached, and the credit spread could be rolled to a later date for a credit if the price hasn’t dropped too far, but if a debit roll is required, the part of the proceeds of the sale of the debit spread can be used to pay the debit required for the roll. I like this choice when a late move puts the credit spread into the money.
The big watch out is that since the credit spread is bigger than the debit spread, it requires more buying power to maintain going forward by itself. In our example, our buying power would increase from $400 to $600 if we closed the debit spread and rolled the credit spread. If the price recovers, the credit spread can be bought back for less than the debit spread was sold for.
How would this roll work on a practical level? Let’s say that with 4 days left, our underlying price has dropped below just below our break-even point for expiration, say to $501. Our position is now priced at -$1.50. Our debit spread is worth +$1.80 and the credit spread is priced at -$3.30. So, we sell our debit spread for $1.80, bringing our total credits received to $2.22 ($0.42 +$1.80). Next we roll our 506/500 credit spread out 10 days later and roll down 6 points to a 500/494 spread for a net cost of $1.50. Our new position has 14 days remaining and is out of the money. Our total cost basis is now a credit of $0.72. Our hope would be that the price would recover and we can close the spread for less than $0.72 and still have a profit.
Or hold for a shot at the big win?
Finally, there is a third option, turning a potential loss into a big win. At expiration, if the price lands between the two short strikes, the maximum profit the width of the debit spread ($2.00 in our example) plus the initial credit received ($0.42 in our example), and the credit spread is worthless. So, a trader could collect 5-10% of the width when opening the trade and then collect another 50% of the capital required at expiration. The question becomes whether you are comfortable waiting for the turnaround in a short number of days. Most people aren’t. The risk of hitting 100% max loss compared to reaching a gain of up to 60% generally doesn’t make sense if you have the ability to limit the loss with a stop loss, or roll and have more time.
The max win is better approached from the winning side, not the losing. But, care has to be taken not to chase a big win and end up with an even bigger loss. Managing winners is just as important as managing losers.
Winner, winner…
This trade is has a high probability of profit. Because of put skew and the market being over skeptical of down moves, this trade is likely to win close to 90% of the time. I generally manage this trade so that the worst case scenario for a winning trade is to have the position expire worthless, and the more likely scenario is to collect a second credit. So, the likely outcome of this trade is that I collect money to open, and then again collect money to close. Really, this trade makes money on both ends of the trade! But, it takes specific action for this to happen, and it can be a bit tricky to set up as the price moves around in the profit zone.
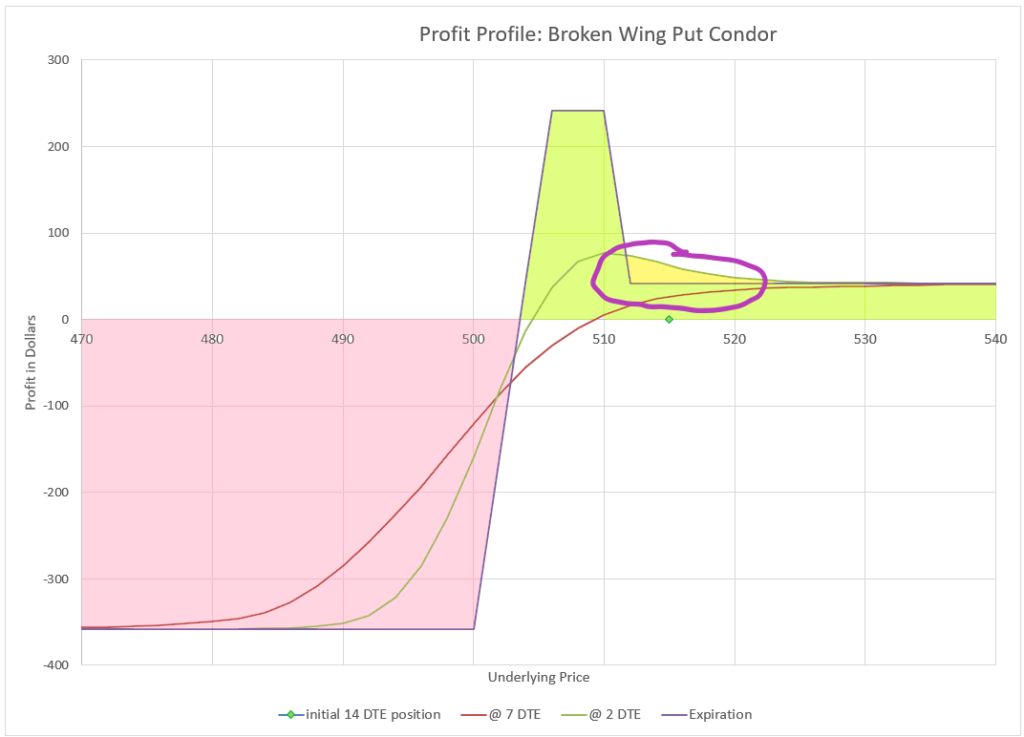
How is this double win possible? As mentioned earlier, with the underlying price staying above all the strikes, the lower spread decays in value faster than the higher spread. The narrow debit spread ends up worth more than the wider credit spread. This becomes apparent in the last few days before expiration. Let’s go back to the position value chart that we reviewed earlier and notice the highlighted green and yellow areas in the last four days of the trade.

Basically, in the last few days of the trade, there is a “wave” of extra profit that starts well above the upper strikes and grows and moves closer to the strikes, and eventually peaks inside the strikes at expiration. So, depending on where the underlying price is, there is a varying amount of extra profit that can be collected in the last few days of the trade. We’ll look at the three price movements from the chart above, and also discuss a slow decline that moves price into the actual condor area.

Big move up strategy
Let’s start with the possibility of a big move up, for example a one standard deviation move up or more. In our example, this would be a move above 530. At these prices, the option premium values approach zero, and the possibility of collecting a credit reduce. At this point, there is very little chance of a loss, and the most likely outcome is the position expiring worthless. This is a good outcome, a safe win!
I see two ways to play this situation. The position can be closed for a very small debit, taking off all risk, and freeing capital for a new trade. The other choice is to put in a good until cancelled (GTC) order to close the position for a small credit, perhaps 0.5 to 1.0% of the risk. This order would only be triggered if price dropped into the wave of positive premium in the last few days of the trade. It’s a long shot, but it’s definitely possible.

Which strategy to take? If there are more than 4 days left, and I can get out of the position for less than 0.5%, I’ll take it and move on. Or if I really would like to have the capital for another trade, then I’d go ahead and close early. Otherwise, I’d take a shot at getting a credit.
Flat to small gain
Often prices end up about the same place as when the trade started, maybe up just a bit. This is actually the most likely outcome of the trade. This is the place where there is a hidden extra profit that appears in the last several days of the trade and then evaporates at expiration. At expiration, if prices are above all the strikes, all the options will expire worthless. But before that happens, the trade value moves from a negative value to positive. My goal is to capture as much positive value as I can.
The way I play this is to enter a good until cancelled (GTC) order for a little less than the maximum value I think will be available. If my order is too high, the wave will pass me by and I won’t get any extra credit. This is a fairly inexact science, so I try to get a reasonable amount. But how much is reasonable?
I utilize my broker’s option charting projections to determine what is most likely to happen to option values. At the brokers I use, I can enter my positions and see day by day what the value at all underlying prices is likely to be. I get a chart similar to the one above that shows a profit curve. I look at the current underlying price and look for when the premium will max out and at what price. I then discount that to a little more than half and use that amount. Why discount? Because these charts are based on pricing models that aren’t 100% accurate and I also don’t know what will happen to the underlying price- a big move might change what the maximum is.
In our example, if the underlying price is still 515 with 4 days remaining, perhaps my broker’s software says that while my expiration profit will be $42, my profit with 2 DTE will be $70, or a difference of $28. $42 is the amount of profit if the position expires worthless, that’s what I collected to start with. So, maybe I’d put in a GTC order for $0.20 credit to close, and hope to get $20 extra credit. My total profit would then be $62, collecting $42 to open and collecting $20 to close.
If the current price was a little higher, like 520, the max profit may only be an extra $5-10, but that’s better than none. Each situation is a little different, so look at where the current price is and how that will likely play out over the next few days as the expiration week begins.
The key is have option price modeling that is close to accurate. How do you know if it is accurate? Look at what it shows for the current day and what the current premium is. So, if your position shows that it has a positive value of $0.10 with three days to go, and your broker’s projection for 3 DTE says $5.00 for the position, then the model or assumptions it is using aren’t right. Sometimes, you can change the Implied Volatility assumptions to match what is currently true. If the numbers are close, note whether the model is a little high or low and adjust your assumptions accordingly. And remember to not get greedy, you would be very disappointed if you put in an order for $2.00, and the premium peaks at $1.95 and then drops to zero a few days later.
Price dropping into body of the condor
Occasionally, the price of the underlying moves down into the upper end of the body of the condor as expiration nears. This is the area of maximum profit. However, even with the wider body of the broken wing put condor, landing a closing price at the maximum valuation can be a nerve-wracking uncertain experience. Will it hit in the body, will it end up a little higher and expire worthless, or will it end up a little lower and be max loss?
My typical approach is to play for a significant extra credit, but not wait to get the maximum at expiration. There is just too much risk of a last minute move that could evaporate profits one way or the other.
My main consideration is where the underlying price is in relation to the body of the condor. If the underlying price is toward the lower side of the body, I look to get out with whatever extra credit I can get as soon as I can, because the last thing I want is to turn a potential nice profit into a big loss by being greedy. I do have the choice of closing the debit spread and rolling the credit spread if things start to turn negative as discussed earlier, but I’d like to avoid that.
On the other hand, if the underlying price is around the upper end of the body of the broken wing condor, sitting around the strikes of the debit spread, I can be a little more patient. Here, my goal is to anticipate how high the profit wave will be in the last day or so will be and set an appropriate GTC order to collect a significant extra credit.
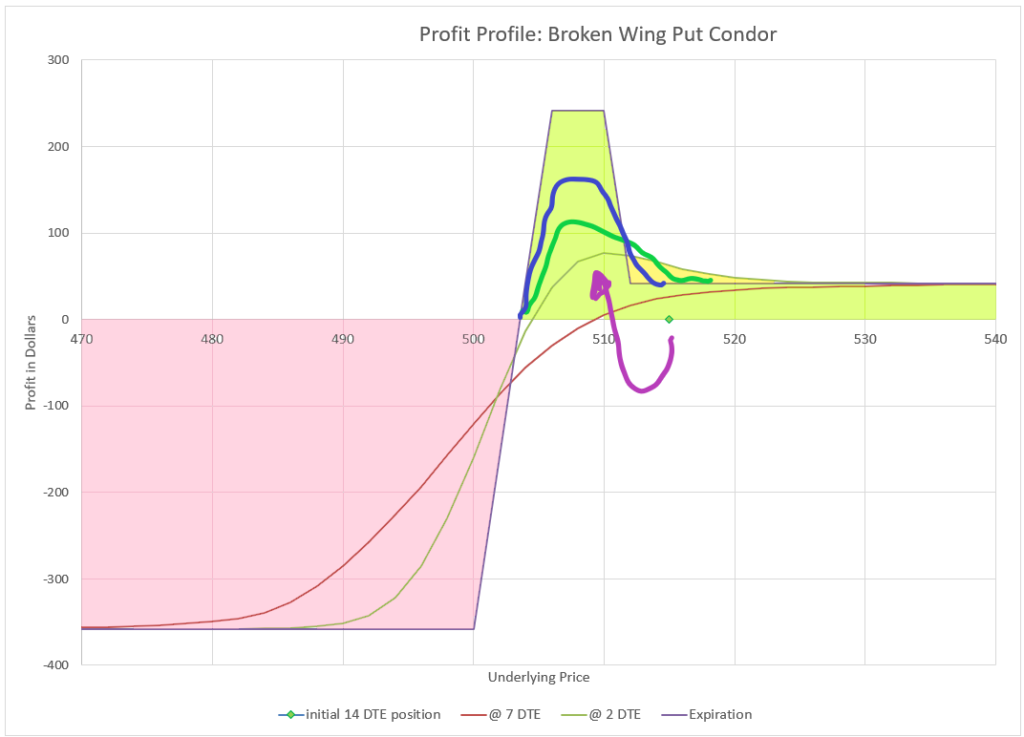
In our example trade, let’s say the underlying price is at $510 with two days left. The option premium value of the position per share is positive $0.30. I could close at that point for $72 total profit (my original $42 collected at open plus $30 extra credit to close), but this position has the potential to go even higher. I look at projected 1 DTE values and see that my position is likely to be priced at $0.60 (the drawn in green line). So, perhaps I enter an order to close at $0.50 to give myself a little wiggle room for unexpected movement and see how things look the next day. As the day before expiration unfolds, I evaluate how the market is treating my position and how comfortable I am with my order. I may choose to increase my limit, or reduce it, depending on whether the profit wave seems to be likely to grow further or less where I’m now positioned. I also evaluate risk of dropping into the loss zone and decide how long I want to stay in the trade.
Each trade plays out a little differently, and my inclination is to error on the side of taking extra credit early that might be a little less, rather than hold nearer to the end. Every trader has their own view of the market and a different level of comfort with risk, so managing as expiration approaches becomes a very personal decision.
Most of the time my positions are well above the body of the condor as I get into expiration week, so there isn’t a lot of drama. I just evaluate what extra credit I think I can get and put in an order for an amount I think is reasonable. I re-evaluate each day and adjust my order if conditions have changed, until the order executes and I’m out.
Final thoughts
There are many ways to set up butterflies and condors with broken wings. The methods I describe here are in line with my philosophy of trading and risk/reward expectations. For many, these trades are just a matter of selling a far out of the money spread to finance buying a nearer debit spread. No matter how you want to think about these kinds of trades, they do have a lot of variables to consider in how they behave throughout the life of the trade. This is not a beginner option trade, and it takes a lot of study to get really comfortable with an approach that matches an individual’s trading preferences.
The big watch out on this trade is that while most trades are wins, if a losing trade is managed poorly, or the market just goes badly against it, a total loss can be pretty devastating. For example, if a trader opens a trade collecting $100 on $1000 risk, expecting to end up with $1100 in a few weeks, but ends up losing all $1000 of the risk capital, it can have a big impact if this position is a significant portion of a total portfolio. As with all option trades, I always consider the impact of a total loss when I enter a trade, even if I believe the likelihood of that loss is low. Even when things go really bad, I don’t want to lose my whole account on one or a handful of trades.
I’ve been very successful with this trade, but it can be time-consuming and potentially full of drama at times. I only have a few of these trades going at any time, because I don’t want to commit too much time evaluating a lot of these trades too frequently. Most of my trades end up making between 5 and 15% in less than two weeks, which is one of my best returns on capital, and also a high probability trade.
For those that want to take this concept a step further, one might consider this broken wing put condor trade a 1-1-1-1 trade, and I also have traded what I call the 1-1-2-2 trade. It’s even higher probability, but higher risk.
In my write-up of broken wing butterflies, I said that it is the hardest trade of all I do to explain to others. Actually, the broken wing condor is more difficult because of the need to evaluate how much extra credit is likely and entering an appropriate amount with almost every trade. But if you consider the broken wing condor just a variation of the broken wing butterfly, then yes broken wing trades are quite complex to understand. So, this is one of the last trades I suggest to new option traders. Don’t feel bad if it doesn’t make sense at first. My suggestion to someone considering this trade is to set up a one contract trade and use a stop loss to prevent a big loss. After seeing how the trade works a few times, consider other management techniques.
Excellent article. Very scholarly and quantitative. Strategy very well explained.
I tried to backtest this for the duration between Jan 3,2022 to May 3, 2022. I found it was lot of drama…the position would be in a bit of profit one day and next day the big gap down in spx will make it impossible to timely manage the trade..ending up with loss much higher than 3x of credit received. On the other hand, rolling out the credit spread ends up needing good amount of debit for each roll..making it extremely hard to get out of the hole…any idea on how to play this during such crazy times..?
You are right. During a consistently declining market, this strategy performs very badly. It works in bullish, neutral, and slightly bearish markets. The problem is with such short duration, there isn’t time to recover from a large move. Some of the other ratio style trades with longer durations are better performers in significantly declining markets, like the 1-1-1-1 and 1-1-2-2 trades I’ve written about. They have a lot more time and are much further from the money. The 14 DTE broken wing put condor can take a decent move down when the market is otherwise neutral, but it can’t take down weeks after down weeks for months on end. I know a number of people did okay with long duration put strategies that were several hundred points out of the money in early 2022 as the market declined.
However, even the 1-1-2-2 trade at 50 DTE would not have fared well in the Covid crash, but there aren’t many option selling strategies that would have fared well in Feb/Mar of 2020. The good news is that we don’t see 30% declines in a month like that very often.
I like to do the same, but with DEBIT. So a Call Buy 170, sell 173, sell 174 , buy 176 on IWM 14 DTE. Looks like your graph. 70$ debit. Looking for 5-10 % on the first 1-3 days. On 15 contracts. Just not as adjustable. But I am always looking to close quickly. Upside is potential for 300% gain if you wait near experation and you end up in the 173/174 area.
.
Joejo- That sounds like a good trade as well. But, watch how you calculate your returns. It sounds like you may be calculating based on debit paid, but in a ratio trade like this, you tie up and risk more capital than the debit paid. If price drops below your bottom strike, you stand to have a position expire with a value of -$1 premium on top of the debit you paid. So, that’s the risk to calculate return against. Your best case is to end with a value of +$2 premium at expiration. So, I think the best you can do is probably a 70-80% return on capital, which still isn’t shabby.
Thanks for the quick reply. Your post was very well done and explained.
The 3/1/2 , Call Debit, Broken Heart/Wing carries NO collateral requirements.
So the profit is based on the cost to enter the trade.
Guessing the same for Put DEBIT
These butterflies need to be started around the .40 Delta-ish. You could do a Straddle of a Call and Put and wait until one hits the highest profit zone and close both.
Joejo- I see. I didn’t pick up on the fact that you are trading calls. So the width of the debit spread of the condor is wider than the width of the credit spread, making the only capital required be the debit you pay. On the call side, I see how that can work- it kind of matches up with my post on bullish call strategies.
However, I don’t think it would work very well with puts because the probabilities would be low and Theta would immediately work against the position, the opposite of the Broken Wing Put Condor we started with in this write-up.
I read with interest about your call debit broken heart wing trade on IWM and wondered how it has performed over time.
Apart from exiting early are there any other tips to managing it that you find
work well.
Thanks
Nick
i am starting trading some broken wing put butterflies and broken wing put condors using tastyworks.
and following the strategies you outlined.
i had a couple of questions
Do i need to wait for a higher or elevated iv before conducting the trades and does an iv drop hurt the
trades alot in terms of pop and max profit and max loss?
Do i need to ensure a certain level of open interest in the option strikes before conducting the trade?
Do you know of where i can find out about placing a stop loss once the order if filled at 3 x the premium collected to protect the capital and limit losses.
Commission on tastyworks is not too high but still eats into the 20 or more dollar credit i have seen for $2 wide over 2 weeks on xsp . Should i try find a lower fee broker or is this amount of around $4 acceptable for these trades
Should i put the order at the mid strike and wait throughout the trading day to see if gets filled or is it
better to put it a little below the mid or nearer the bid to ensure the orders get filled.
Any feedback will be highly valued
Thanks
@Nick- That’s a lot of questions! Let’s try to take them one by one.
Selling any kind of short put strategy, including the broken wing put butterfly, will generally do better when IV is higher. Higher IV allows the seller to sell further away from the current price and often for more premium. If I have a choice, I like to get in on days when the market is down. Other traders will take a pure mechanical approach and won’t try to outsmart the market. The initial probabilities are theoretically the same, but when IV is high, it tends to revert towards its mean, which is an advantage. Each trader needs to determine a strategy that is appropriate for them and their risk tolerance.
I see you are trading this with XSP. You are right that many strikes aren’t very liquid and commissions can eat a lot the potential profit. I don’t use XSP much for those reasons, but when I do, I stick to Friday expirations, which have a little more volume and liquidity. There are brokers that have lower commissions on XSP, at least that’s what I’ve heard. SPY will be much more liquid, but it isn’t cash settled and it can be assigned early. My preference is always SPX, but I know that is out of reach for many traders that have smaller accounts or just don’t want to put up that much capital in a single options trade.
If you go $2 wide on XSP, you might collect around $20, so $4 commission seems like a lot, considering you can’t win them all.
Brokers are starting to limit what can be done with stop losses around option spread strategies, and Tasty has always made it hard to employ stops. The logic is that often a stop can get triggered by a single random low tick, filling an order at a bad loss that should never have been filled. Most all brokers allow stops on a single option, but that is less than ideal.
Order filling is an art, as much as it is science. I try to get filled at the mid point and sometimes I’ll let the order sit. But often, I’ll adjust the premium on the order by one tick at a time until I get filled, just to be done with it. There’s an argument to be patient when opening a position, and less patient when getting out at a loss. However, ideally I’m closing each broken wing butterfly at my profit target with a limit order that I place as soon as I open the order. So, if I collect $2.20 premium on a 20 wide SPX BWB, I’ll usually immediately enter an order to close at $0.40 good until cancelled.
Thankyou for your articles! It would be great to see a little more of your recent work 🙂
You’ve spoken a lot about Option Price Modeling. Is this an essential element to being able to make these trades? It looks like you’re doing a lot of decision making based off that software.
I trade with Etrade and don’t think they have that type of information? Is this something that you can get elsewhere and then still use an Etrade brokerage? Where are you getting this modeling?
Great writeup. Learned a ton.
It isn’t critical to understand option price modeling. I think it is important to understand the key factors that determine pricing- difference from strike price to current price, time until expiration, and implied volatility. The analysis charts of major brokers will give you similar charts. The charts on this site are illustrations of the most likely outcomes viewed from a variety of perspectives to help visualize what happens in different scenarios. Once you generally understand how time values will decay at different prices in a given trade strategy, you can build a plan for how you want to respond to different situations.
Hi CAllen,
Thanks for sharing your ideas on this site; it is very generous of you. This BWC trade is maybe the most interesting to me, but I have read your articles and done trades on 7DTE Put Spreads and BWBs too.
I am always looking for edge. I have tried them for the last week or so, and so far all winners, although have had minor losses on 2 rolls. The FOMC meeting seemed to juice the returns (initial credit). Now I can not get as high a yield on entry. Some questions on all three setups:
1. On 7DTE P spread after FOMC, I put on trade =June 17, 5370, +5365 and got $75. But the max loss is $425 and Etrade says there is a 14% chance of max loss. The yield is 17.6%, with communications and slippage saying 16%. That is not much of an edge. Do you think the reason it has made good money is just the market has been so steady up while you have done this trade? Or maybe early exit means less yield but even less chance of maximum loss?
2. On BWC, I think there may be an extra edge. It is that between now and max loss, you get max gain hump in PL in later days. I have a June 14 BWC +5395,-5390, -5380,+5370 but only got $40 credit, so $460 loss possible. Etrade says that has 95.5% win odds, so that is an edge, but it is already +$20, so that gets odds back to about even. CAllen, have you found that in general, the percent chance of max loss is about the same as yield on various spreads? It would sort of make sense.
3. This is why I like BWC in concept, the profit bump is near max loss. It seems like an edge to me. You mention it is hard to manage, why not do some sort of autotrading? With TOS think you can use OCO orders to maybe handle autotrading your strategies? Anyone her suggest a good option autotrader and or backtester? BTW Lookback by Tasty is fast and decent backtester, and it verifies good results on these setups.
4. When I setup the trades 1 or 2 weeks out, I then try them at shorter DTEs and the price may be the same or not all that much less yeild% (credit). So I gravitate towards shorter DTEs as the odds are way better that max loss does not happen. You mention on BWC the best theta income is after 5 DTE, why not just put it on at 5DTE?
Thanks again for your great info, pardon the blizzard of questions, it is 1 week’s worth.
For question 1, for the 7 DTE spread, realize that the max lost probability that your trading platform shows is when you hold to expiration. I almost never hold anything to expiration, mainly to take max loss off the table. For most short sale trades, the worst losses happen in the last half of the duration, so avoiding that time is my goal. Note that when I do 7 DTE, I’m rolling out all the time, and rolling down if the market goes down. There’s no guarantee that this will always work, and a bear market or significant correction makes this trade undefendable. But, managing early usually lets you keep a good chunk of your gains and avoid the worst of losses.
I think this is discussed in some detail on the 7 DTE spread page.
For question 2 and 3 on the BWB, the only time you can get the benefit of that max profit is on expiration day, and the difference between max profit and max loss can swing quickly. So, if you have the stomach for that drama, you can have the potential for a big win. I typically try to get my money by the time there are 7 days left, close out and open a new 21 day position. Or if I’m losing, I cash out the debit half of the position and roll the credit side down as far as I can with the proceeds from the debit side. I’ve occasionally been able to close for a credit, but generally I don’t wait that long in this trade.
I think this is covered in some detail in the BWB page.
I do use limit orders to close my positions. The issue goes back to the premiums don’t collapse on the lower put until well into expiration day and the upper spread doesn’t hit its max until expiration day. The closer we get to expiration, the bigger that peak profit is, and if you can figure out what it is as the day progresses to set a limit order, you might snag it as it passes through. But the market may also plunge down to max loss.
Thanks CAllen! On this question I was not thinking of waiting to the very end, but 2DTE if to right of peak, then if it heads towards peak it first has to get past the theta “hump” right next to profit peak. So the idea is to calculate 75% of expected hump going left before peak, say it is an extra $80, put in limit order that is 75% ($60) better than the credit to start.
Thought being if SPX crashes, it has to pass the hump first and you get out with extra $60 profit and protect against the max loss at the same time. Make sense? Have you tried something like that?
I just reread the article and see that is what you do—a limit order to catch the extra profit.
I meant 1 DTE, but after hours of fiddling with it, I see that longer-term ones with a wide spread between middle strikes can create a big enough range for Maxgain to go for it. with a stoploss. Thanks for this idea; I really like this trade. Even 2DTE, quite a hump can develop.
Cheers
Darp- on the question about the hump in profit. The hump doesn’t get that big until the final hours before expiration, so passing through has to be optimal timing to really cash in.
For question 4 on BWC, you are right that you can set up essentially the same trade at about any amount of expiration. Shorter duration means faster decay, but also the potential for faster losses. Longer duration trades take longer to play out, but also give the trader more time to decide how to respond when things go wrong. It’s a matter of preference.
CAllen, so do you do any automation on these trades outside of limit orders? If you were to use an option automated trading system, which one do you think is the best one? Thanks
Last question. When the index does go down, is Vega a problem? Do those bonus profit bumps tend to get better or worse in your experience?
Thanks
Darp- on the Vega question- while you are right that implied volatility goes up when the market drops, the big bonus bumps are not going to appear until very near expiration. The out of the money puts will hold value, and the in the money spread will not max out until very little time is left. The later you enter the trade, the narrower the window you can create where you collect a decent premium and have a profit hump to shoot for. It isn’t impossible, it just isn’t likely to work very often.
Darp- on trading automation, I know there are many traders that make use of APIs with brokers to enter trades where they monitor live data and use scripts and logic to pull the trigger on trades. I haven’t done that myself, but if you explore around the internet and social media sites on trading, you can find folks doing that who will be willing to share how they do it.
CAllen, Thanks for all your info. I have noticed what you say about near-term ones having narrower max profit plateaus because to maintain a credit the middle strikes have to get closer. So indeed, to have a decent shot at max profit, 14DTE seems like a good time to put on.
Also on Call above current price BW Condors in addition to the bull bias in the market, the spreads are only half as appealing when put on as are Put ones, I have put 1 on, which will likely make money and is likely the last will ever do. There may be no edge on them, but excellent edge on Put ones. Cheers
Darp- there are endless tweaks that can be made to this and any options trade to make it work better for certain things. There’s always a trade-off, and as long as one sees the pros and cons and takes those into the trading management plan, then the changes may better suited to the way a trader is comfortable. Two people can enter the same trade and have very different outcomes, based on how each manages the trade, which could be based on their risk tolerance, or just how active each wants to be. It isn’t right and wrong, it is just different, and finding trades that are best suited to the temperment of the trader.
On the call side, it’s a big difference. Volatility skew tends to make the call strikes worth a lot less, be closer to the money for the same delta values, and generally have much lower probabilities of success. I seem to fail to learn this lesson even though the market continually tries to teach me that call selling strategies of almost all kinds lose a lot more than they would appear at first glance. It’s so tempting, but the market likes to go up more than I expect and when I don’t expect it to. I should know better.
Dear C Allen,
Thanks for sharing your thoughts and reasoning about this strategy. I like the way you approach to the trade. I’m trading something similar on RUT and SPX but with 60-80 DTE.
I would like to ask you about the backtesting tools you use. I’ve been checking tastytrade, optionalpha, orats and optionomega, but I have not been able to configure all the tweaks you need to simulate the right entry and replicate it over time. So, would you mind sharing the way you backtest this strategy?
Thank you very much
Best regards
Curro- There’s no perfect backtest, but in the ones I’ve used, I try to start with simple setups- open at X DTE with certain deltas and close at Y DTE. Then I add other factors like exiting at a profit target, or adding stop losses. For broken wing style trades with three or four legs, backtesting is really hard to do for the way I pick strike prices, since I pick based on a Delta range and then use width multiples to determine my individual strikes. And I often adjust to collect the premium I want. No backtest I know of will do all that. So, I try to get as close as I can and see if the results match what I’ve experienced or expect. The more legs and criteria there is in a strategy, the harder it is to backtest accurately.
I think of backtesting as just one of several ways to look at a trade. First, when considering a trade, I look at the Greeks to understand how the position will respond to different factors. I use models to understand how the trade will behave as prices change and view how that profile changes over time as the position approaches expiration. But for me the biggest test is putting my own money to the test. When I trade a strategy myself, I see how things play out in real time, how emotions impact my thought process, and how manageable a strategy is in actuality. I try to stay with single contracts until I’ve seen trades that go both good and bad. I log the trades so I can analyze what went well and what didn’t and review my mechanics to get better. Sometimes I’ll try different variations in different accounts or with different underlyings to see if one is easier to manage or gets better results. Once I’ve thoroughly tested something, I usually go back through the original analysis to see if what I ended up trading matches the analysis. I also try to shoot holes in a trade, trying to come up with worst-case scenarios and think through what I would do, weighing different alternatives. I try to analyze and test those choices as well. In the end testing and analysis only go so far- the market is random.
Every trade someone proposes, or I think of, is something to study as many ways as possible. I hope that anyone reading about specific strategies on this site feels the same way and uses the analysis and tactics listed as just a starting point to analyze and define their own strategies.
C Allen, thanks for sharing your thoughts. I agree that backtesting is only one way of looking at the trade. It’s difficult to backtest adjustments and emotions when you have entered the trade. And in this specific trade, exit conditions are particularly special to define.
I’ve found a way to backtest entry conditions only and, at least, being able to go through those trades that are against the strategy in order to study if they can be avoided somehow.
I’ve been reading some of your other posts, very interesting. Thanks again
Very clear and inspiring, as usual 🙂
Actually I have a question / request that I find important for all option trader, for which I have no clear view : volatility.
Volatility context seems so important to pick the right strategy at a given moment.
Backtesting well known strategy (BWB A14 or M3.u, the 1.1.2.2…) I find very different outcome and stress level based on the volatility context :
– hi/low implied volatility
– vertical skew : flat or U-shaped
– horizontal skew for calendars : contanfo and backwardation
– skew assymetry between put and spreads
– IV vs Historical volatility (it seems we are in a period of low IV but where market are reacting much stronger to news, which easily blows some strategies)
Do you know any good ressources that takes all these concepts methodically : recognizing the volatility pattern, explaining the implications, and highlighting the best strategies or how to cover common strategies)?
Or do you have insights based on your experience and research?
By the way, I’d be thrilled to contribute if some number crunching or back testing were required.
Have a great Xmas break!
Stephane- I know Tasty has done numerous studies on the impact of high implied volatility vs low- it’s one of their major philosophies to trading. The main take-away is that in periods of high Implied Volatility, premiums are higher, strikes with attractive Deltas are further away from the current price, two key factors that greatly improve odds for option sellers, particularly bullish option sellers.
On the flip side, during very low Implied Volatility periods, premiums are low and expected moves are low, so there isn’t as much money to make selling premium, and risks of unexpected moves are not adequately compensated. Low IV markets can go on for a long time, so one can’t expect a big negative event to happen just because the market has low volatility, both historic and implied. But, option buying strategies start to make more sense when volatility is low. The idea is to buy options when they are cheap, and sell them when they are expensive.
I did some studies at one point to back this up and I never published them because they became dated, but the idea is that option prices to a great degree have prices that match up to what has happened in previous periods of similar market behavior. Skew and other observed patterns in data have historic relevance to how options are priced. That doesn’t make them predictive, but volatile markets tend to slowly calm down, while calm markets stay calm for long periods until the suddenly break down, often with little warning.
Thank you, Mr. Allen, for sharing your knowledge and experience with us and for running this blog!
I would like to share some thoughts on the topic of “Why a condor instead of a butterfly?” If you set up both trades according to your delta suggestions, you get roughly the same (lower) break-even point – so both trades offer more or less the same margin for price losses on the underlying asset. I’m not sure if I’ve understood this correctly, but the condor seems to have a higher vega (roughly 20% based on my observations so far). I haven’t compared the development of the P&L lines over time for both trades, but based on the vega, the butterfly seems to be better suited for calmer markets, as it doesn’t destroy as much value when volatility increases. When markets are nervous, it seems better to open condors, as they offer higher profits when markets calm down again later.
So please don’t hesitate to criticize my thoughts! I would appreciate it. Please excuse my imperfect English. I am writing from across the pond.